
I think we’ve all been told at one point or another that we should sit up straighter or work on our posture. But if you haven’t yet, I’ll be the first to tell you – work on your posture! The reason why it’s so important to pay attention to our posture is because it can tell us how well our musculoskeletal system (made up of our muscles and bones) is working . . . or rather, the potential it has to work optimally. However, first we need to understand what optimal posture looks like so that we can identify whether our posture deviates from this “ideal” form (everyone’s does to a certain degree). This understanding will allow us to determine what structures may be at risk for injury or determine why you’re experiencing pain or dis-ease more precisely.
Human anatomy has been studied for hundreds of years, dating back to the ancient Egyptians as early as 1600 BC. In the 1500s AD, Leonard da Vinci began a series of drawings that were aimed at depicting the ideal human form. He possessed an innate understanding that you must first know what “normal” or optimal form looks like to truly grasp what characterizes abnormality and disease. It’s also important to note that we can be born with muscular and skeletal abnormalities and we can also develop them as we age. In this article I am going to help you identify and address the latter.
I am going to provide you with a systematic top-down approach to helping you first learn what optimal posture in a certain body region looks like, and then give you some posture correction exercises if you find that you deviate from optimal form. We will not be covering anatomical structures below the hips because those structures are not as impacted by our poor sitting posture and work habits.
That being said, this article will be particularly useful for anyone who spends a lot of time seated and/or looking at a screen or mobile device, or who is not regularly physically active (a.k.a. pretty much everyone can benefit from these exercises). As a disclaimer, if you have a diagnosed disease or injury, or have been experiencing chronic pain (pain for over 3 months), these exercises alone will likely not solve the problem. It is best to seek out professional advice from your doctor or physical therapist so that you can address your specific needs.
Head and Neck Posture and Exercises

A quick and effective way to determine whether your head and neck are in optimal alignment is by determining where your ear hole (anatomically called your external auditory meatus) lies in comparison with the profile of your body below as shown in the picture. Pretend that there is an imaginary line starting at your ear hole and running down the side of your body. Ideally that line should run through the middle of your shoulder and arm so that your cervical spine (in your neck) and the surrounding muscles are in optimal alignment (pictured on the left). What often happens when we’re staring at screens or seated for long periods of time is that we start to adopt a forward head posture (pictured on the right). As you can imagine, the line from the ear hole down the side of the body would lie in front of the shoulder rather than straight down the center of the arm.
If this is true for you, perform the following exercises:
1. Suboccipital Release
You will need a trigger point release lacrosse ball in order to help you effectively release the muscles at the base of your skull called your suboccipital muscles. These muscles often get tight when chronically assuming a forward head position, and could be causing tension headaches.
For this exercise, you can either use a single or double lacrosse ball and place it directly under the base of your skull. While keeping the ball here, lay on your back with your chin in a tucked position so that you feel pressure from the ball pressing against your suboccipital muscles. You can either lay in this position with your head still or you can nod your head up and down or rotate your head side to side, massaging through any tender points. Watch the video below demonstrating of the up and down nodding motion or the side to side head rotation motion of this exercise. Perform this exercise for one minute first thing in the morning and one minute at night before bed every day of your work week.
2. Chin tucks
You can do this exercise with or without a theraband. However, adding a theraband may help you nail down the proper movement pattern of the exercise by providing resistance in the intended direction of force. Plus, this pack of three bands will allow you to progress the exercise by using a higher resistance band over time, and can be used for a variety of different exercises as well.
For this exercise you’re moving your head from a “neutral position” – with you ear hole aligned with the center of your shoulder – to a retracted position, which looks like making a double chin. Try to imagine that there is a horizontal line from the bottom of your chin through the back of your spine, and that your chin is moving back and forth along that line. You want to keep your mouth shut with your teeth lightly touching, and focus on the movement coming from the front of your neck rather than your jaw. This exercise is helping to strengthen the deep muscles at the front of your neck, which get lengthened and weak with forward head posture. You can start by doing this exercise while laying down on your back, which is slightly easier than doing it while seated and or standing. Once you get the hang of it, I recommend practicing this movement in the position you’re in for most of your day (most likely sitting) because that is the position we’re hoping to improve your postural habits in. Watch the videos below demonstration of chin tucks while laying down and in standing and seated with and without a theraband. Perform 30 repetitions of these three times throughout your work day.
Shoulder and Upper Back Posture and Exercises
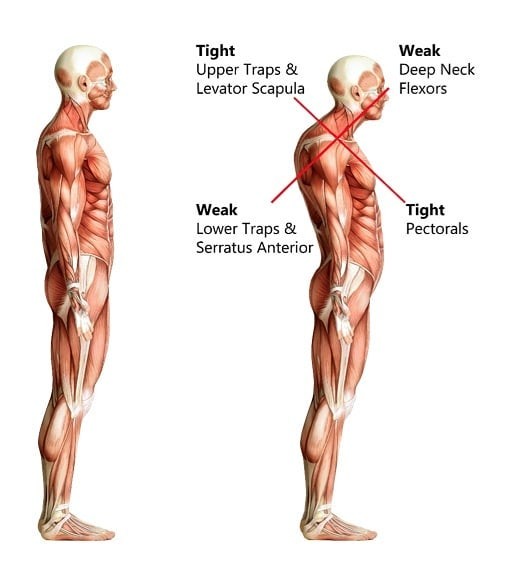
If we expand our view of the human body, we can see how the postural abnormalities we may have found in our head/neck contribute to problems downstream in the shoulders and upper back. Collectively, these postural deviations are called Upper Crossed Syndrome, and include the following impairments: weak deep neck flexors, tight upper traps and levator scapula, tight pecs, and weak lower traps and serratus anterior.
That isn’t to say if you forward head posture then you will definitely have concurrent shoulder and upper back positional deviations, but the odds are definitely greater. Some general characteristics to look for to determine if your upper back and shoulders are resting in suboptimal postural positions, is an obvious increased curvature or “hump” in your upper back or if when laying on your back on a flat surface the back of your shoulders do not touch the surface (as shown in the image below), respectively.

If you do notice either of these characteristics, you will benefit from the following exercises:
1. Doorway Pec Stretch
As I mentioned earlier when discussing upper crossed syndrome, you will likely have tight pectoralis muscles (chest muscles) due to your shoulders resting in a forward position, which places the muscles in a chronically shortened position. To address this, you can perform a doorway pec stretch. Start by placing your forearm (or both forearms if you are performing both sides at the same time) up against a doorway opening with your elbow bent approximately 90 degrees, then place one foot in front of the other and slightly leaning your body forward until you feel a stretch at the front of your shoulder(s). If you feel a stretch anywhere else (like the back of your shoulder), try sliding your forearm up or down along the door frame until you just feel a stretch in the front. Hold this position for one minute on each side and perform this stretch three times (each side) throughout your work day. Watch the video below to show you how to perform a doorway pec stretch.
2. Foam Roll Thoracic Extensions
Our pecs aren’t the only anatomical structures that could benefit from stretching and mobility work. In order to address the increased rounding in your upper back, you can perform foam roll thoracic extensions. As implied in the name, you will need a foam roller to perform this exercise.
For this stretch, you’ll want to lay on your back and place the foam roller horizontally across your spine along the peak of the curvature in your upper back. With your hands resting behind your head, your knees bent, your feet flat on the floor, and your chin tucked into your chest, gently lean back over the foam roller while keeping your bottom in contact with the floor. Then slowly bring yourself back up. Make sure you’re not letting the foam roller slide up and down your back as you perform this motion. If you’re doing it correctly, the movement should look similar to a partial sit up, however the goal is different. This exercise is effectively mobilizing your spine to counteract the increased curvature in your upper back by applying force in the opposing direction. In doing so, you are helping to restore equal distribution of weight through your spinal discs, and mitigate stress on the surrounding musculature due to a compromised length-tension relationship. Watch the video demonstration below to ensure you’re performing thoracic extensions on a foam roller with proper form, and perform 20 repetitions of this exercise once in the morning and once at night every day of the work week.
3. Shoulder W’s
Another characteristic of upper crossed syndrome is weak lower trapezius muscles. The trapezius muscle spans most of your upper back region and is made up of upper, middle, and lower segments. One exercise to help strengthen the lower trap, as well as the middle trap and rhomboids (between your shoulder blades), and rotator cuff muscles (behind your shoulders) is called Shoulder W’s. For this exercise you will need a theraband similar to the one used for the chin tucks.
Start by either sitting or standing up straight while grabbing the theraband with both hands, and your palms facing upwards. Keeping your elbows glued to the sides of your body and your elbows bent slightly more than 90 degrees, pull the band apart and backwards, making a “W” position with your arms. To ensure you’re activating the correct muscles, make sure both thumbs are pointing backwards and outwards as you pull the band apart. As you pull, also focus on keeping your shoulders drawn down, away from your ears and squeeze your shoulder blades together. Perform three sets of 15 repetitions two times per day. Watch the video below to ensure you’re practicing proper form.
Lower Back and Hip Posture and Exercises
Would you look at that?! All of those deviations we saw above could co-exist with even more problems downstream in the low back and hips. And let me clarify – the consequential nature of poor postural characteristics throughout the body is not a unidirectional phenomenon. Meaning, even if you didn’t have any of the postural deviations I’ve listed so far but you do have the ones I’m about to address, you are at a potentially higher risk for developing suboptimal postural qualities (and/or injury) in the structures above and below the region that is currently afflicted if not addressed.
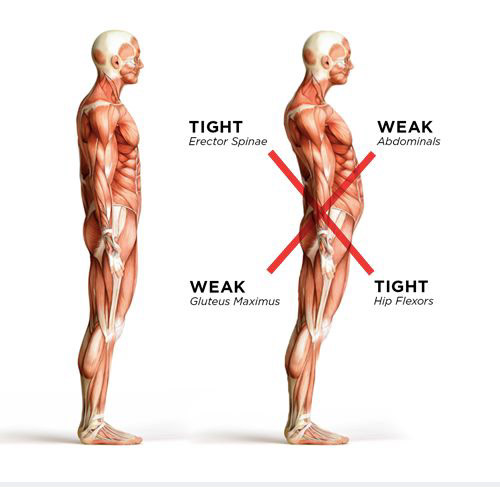
When the low back and the hips are impacted by poor postural habits, such as sitting for long periods of time, you may develop an increased curvature in your lower spine with concurrent tightness in the front of the hips. This postural phenomenon is called Lower Crossed Syndrome, and includes the following impairments: tight erector spinae, weak abdominals, weak glutes, and tight hip flexors. If when standing up in a tall, relaxed position, you notice that your lower back excessively arches and it appears as though you’re sticking out your bottom, it may be because you have Lower Crossed Syndrome.
These two exercises will help combat the detrimental consequences of this postural deviation:
1. Kneeling Hip Flexor Stretch
The muscles at the front of our hips (called our hip flexors), are probably one of the most commonly impacted muscular structures that almost everyone can benefit from stretching. That is because even if you sit up tall, with your head in a neutral position, and without rounding your shoulders or upper back, your hips still remain bent in a seated position. In this position, the hip flexors are in a shortened position so if you sit for long periods of time, the muscles become stuck in this shortened position.
A kneeling hip flexor stretch is an effective way to help open up the hips and stretch out your hip flexors. Start in a half kneel position with your trunk positioned up tall. Then squeeze your glutes or focus on drawing your tailbone downward towards the floor. You should feel a stretch in the front of your hip on the side with your knee resting on the floor. If you do not feel a stretch yet, slightly shift your hips forward while still squeezing your glutes. Do not shift so far forward that you are having to arch your low back to keep your trunk up tall. Hold this stretch for one minute on each side and perform it two times a day. Watch this video of the stretch to make sure you’re doing it correctly.
2. Bridges
Two impairments associated with Lower Crossed Syndrome are weak glutes and weak abdominals. Again, this is due to alterations in the length-tension relationship of the muscles. This means that the optimal length and force producing ability at which the muscles function has been disrupted due to changes in posture. One exercise that can help strengthen the glutes and the core muscles simultaneously is bridges.
Start by laying on your back with your knees bent, and your feet flat on the floor hip distance apart. You are going to drive through your heels to lift your bottom up off the floor while squeezing your glutes. Similar to the kneeling hip flexor stretch, you don’t want to lift your hips so high that you are simply arching through your low back. In order to activate your core, think about drawing your tailbone towards your feet before you begin the exercise and keep it in that position throughout to ensure constant abdominal muscle engagement. Here is a video demonstrating proper bridging technique.
To increase glute activation you can also add a loop resistance band above your knees and slightly press outwards with your knees throughout the motion – watch this video to see proper form using the loop band. Perform three sets of 15 repetitions three days a week.
Summary
For your convenience, I put all of the exercises I mentioned above into a table with their targeted body region, the name of the exercise/stretch, the equipment needed, the recommended sets and reps, and the video demonstration link.
| Exercise | Equipment Needed | Sets/Reps | Video Demonstration |
| Suboccipital Release | Trigger Point Release Ball | 1 minute2x/day5 days/week | Up & Down Motion Video Side To Side Motion Video |
| Chin Tucks | Theraband (optional but recommended) | 30 repetitions3x/day5 days/week | Laying Down Video Sitting/Standing With/Without Theraband Video |
| Doorway Pec Stretch | None | 1 minute3x/day5 days/week | Both Sides Simultaneously Video |
| Foam Roll Thoracic Extensions | Foam Roller | 20 repetitions2x/day5 days/week | Form Video |
| Shoulder W’s | Theraband | 3 sets of 15 repetitions2x/day5 days/week | Form Video |
| Kneeling Hip Flexor Stretch | None | 1 minute (each side)2x/day5 days/week | Form Video |
| Bridges | Loop Resistance Band (optional but recommended) | 3 sets of 15 repetitions1x/day3 days/week | Without Theraband Video With Theraband Video |
Injury Prevention Versus Rehabilitation
What’s great about learning to analyze our posture and being able to recognize any deviations from “normal,” is that it allows us to see into our future and determine what may lead to pain or injury without experiencing any unpleasant symptoms presently. It is a physical representation of how our bodies have adapted to how we carry ourselves most of the time. If we can react to what our bodies are showing us and strengthen our weakest links before they break, we can guarantee the longevity of our health and function. I hope that these seven exercises will find their way into your weekly routine sooner rather than later so that you can mitigate or avoid suffering from preventable pain or injury caused by poor posture.